
Scan Web Servers For Vulnerabilities Using Nikto Kali Linux
Scan Web Servers with Nikto
Welcome back today we will be talking a little about web vulnerabilities and how we can scan for vulnerabilities in web servers using Nikto.
Before attacking a website its vital to do reconnaissance on the target website this helps us gather & log various information about the website or target web application. This then helps us to understand what configuration the target web server is using. Doing a little re-con allows pen-testers to save a lot of time by targeting the configuration of the webserver and web application the attacker can quickly find exploits to comprise the webserver.
It’s quite pointless going into a pen-test and just trying any attack vectors as quite often it won’t work and often take up a lot of time following the correct procedures will save you hours of time.
Nikto is an Open Source (GPL) web server scanner which performs comprehensive tests against web servers for multiple items, including over 6700 potentially dangerous files/programs, checks for outdated versions of over 1250 servers, and version specific problems on over 270 servers. It also checks for server configuration items such as the presence of multiple index files, HTTP server options, and will attempt to identify installed web servers and software. Scan items and plug-ins are frequently updated and can be automatically updated. Nikto is not designed as a stealthy tool. It will test a web server in the quickest time possible and is obvious in log files or to an IPS/IDS. However, there is support for LibWhisker’s anti-IDS methods in case you want to give it a try (or test your IDS system). Let’s assume you’re running a small website you want to keep your users safe
Downloading Nikto server scanner
Nikto is a tool that comes pre-installed within Kali Linux and other Linux Operating Systems designed for pen-testers.
If your using another version of Linux you can download Nikto by following the link below.
Nikto web server scanner – https://cirt.net/Nikto
Or alternatively, install Nikto from a command terminal using command.
sudo apt-get install nikto
Requirements
- Linux Operating System (We will be using Kali Linux 2017.2 in this tutorial).
- Nikto Vulnerability Scanner
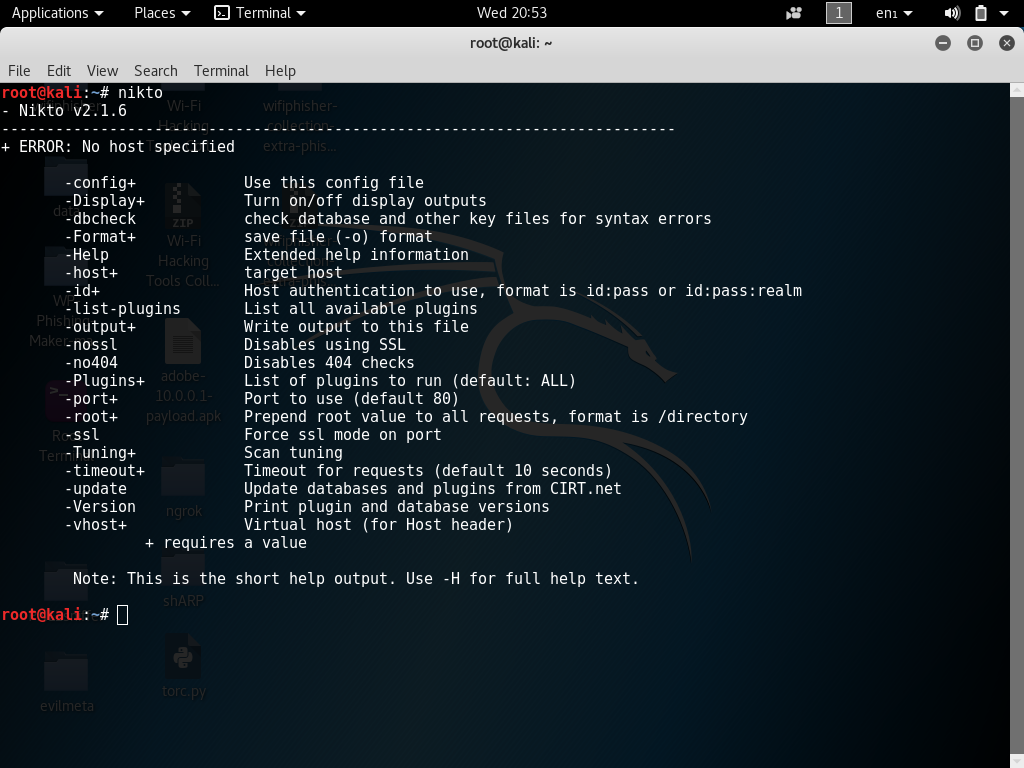
First of all, open up a new command terminal and use command nikto -h to load help options or nikto -H for full help options this will help us understand a little about how Nikto functions.
Once you understand the options a little and your happy to continue choose what options you want Nikto to use while scanning for web vulnerabilities.
Example
Let’s assume we have a target website in mind, for example, www.targetwebpage.xyz we could target this host
to reveal potentially damaging information about the webserver and its configuration. Using the command below will allow Nikto to scan for vulnerability within the
target server first I will do a scan of my own network this network is not running a Website.
Let’s start scanning for vulnerabilities.
In your command terminal to launch Nikto against the target website using default settings, we could use the following command.
Replace the target site with the webserver.
root@kali:~# nikto -h www.targetwebpage.xyz
nikto = binary -h = host www.targetwebpage.xyz = target
In this tutorial, I will use a web server that was set up for testing purposes. (Read the disclaimer before attempting to target any web servers).
As you can see from the screenshot below Nikto has successfully scanned the target for vulnerabilities.
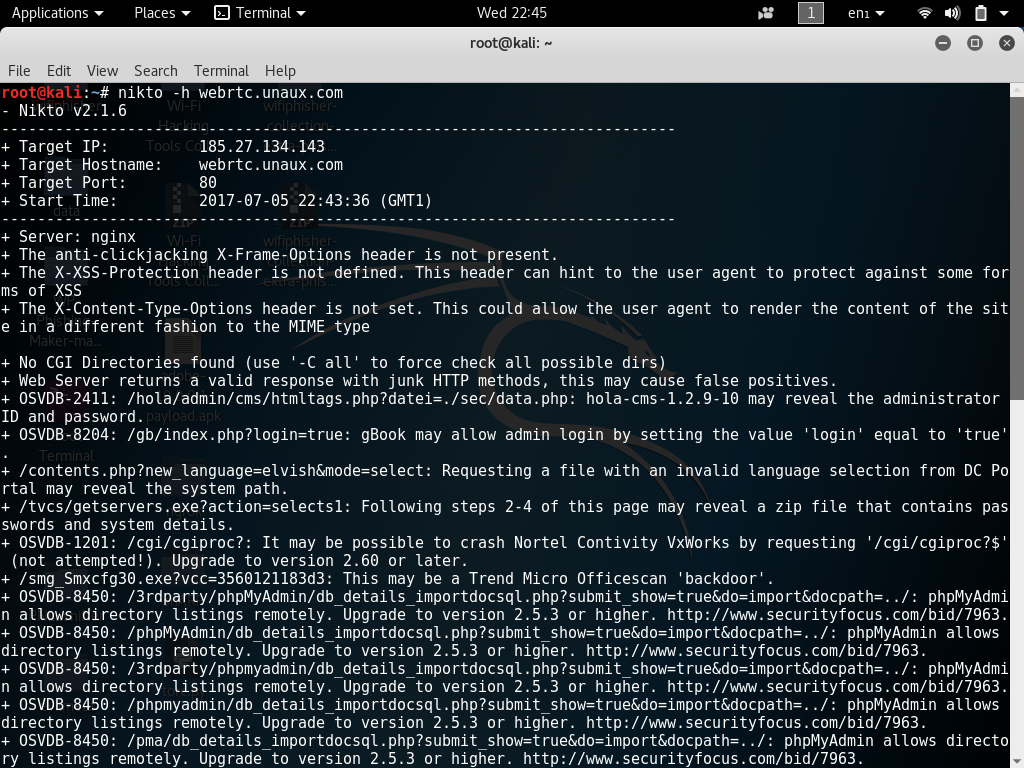
Each vulnerability found will be labeled with the exploit code. We can then look up this code in various exploit databases such as Exploit-DB & Security Focus.
Sometimes Nikto scans can revel false positives this is because Nikto does not execute each of the possible vulnerabilities but in turn, scans to see if the server will
respond without any errors to any known exploitable URLs.
Nikto contains a collection of various plug-ins to list all plug-ins available to Nikto use command.
root@kali:~# nikto --list-plugins
Nikto + Tor
root@kali:~# sudo apt-get install tor
install Proxychains will allow applications to run through the Tor network. Using Tor will help to add a little bit anonymity however when users say using Tor keeps a connection hidden is very untrue this is because when data is sent back and forth between intermediates and your ISP routers it always ends up at an end destination known as an endpoint. So let’s imagine that these endpoints were set up as honey traps with misconfigured Tor routers and endpoints or let’s say law enforcement owned one of these endpoints it could essentially leak vital data that could result in Tor users being exposed. Tor is good as taking lots of hops between intermediates while sending traffic on the Tor network this can make it harder to trace back to the user I’m not saying this to scare you but rather to settle this urban myth about Tor being safe some website also deny Tor connections and will connect up using your real IP. Want Tor to really work? you need to change some of your habits, as some things won’t work exactly as you are used to.
Want Tor To Really Work? Tor Project
Now that we know a little about Tor we can continue.
Install Proxchains
root@kali:~# sudo apt-get install proxychains
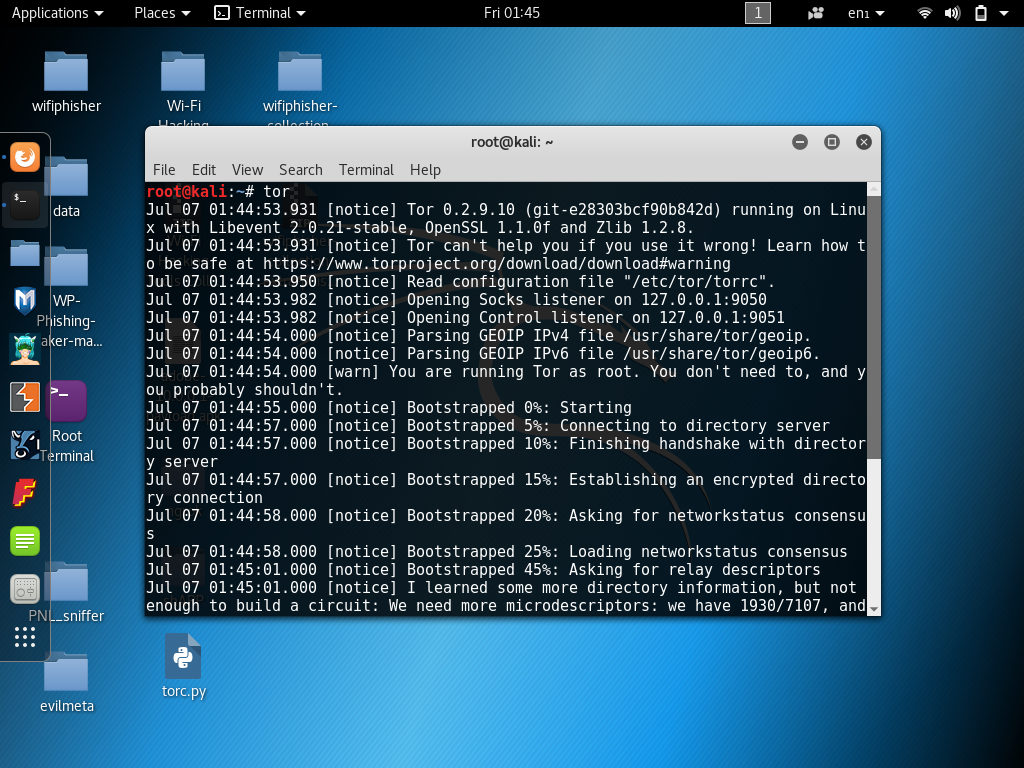
in a new terminal start Tor using the following command.
root@kali:~# tor
Now we can use netstat to find what port Tor is running on.
root@kali:~# sudo netstat -tanp | grep tor

Now we need to edit /etc/proxychains.conf and add the next line.
nano /etc/proxychains.conf
socks4 127.0.0.1 9050
Scroll to the bottom of proxychains.conf you will see a line for socks 4 tor defaults at the start of the line you will see that the line is commented remove the comment from the start of the line and save proxychains.conf

Start Nikto using Tor SOCKS 4 Proxy this will allow Nikto to use Tor while finding web vulnerabilities this will help keep your anonymity I will explain a little more about using Tor later in this article.
Open up a new terminal leaving Tor running in a separate terminal use the following command to start Nikto. Replace with the target web servers domain or IP address.
root@kali:~# nikto -h www.webrtc.unaux.com

Using Nikto with VPN
Using a VPN with Nikto was never easier to connect to a VPN server using OpenVPN.
You can download free VPN servers for free from VPNBook if you don’t have a dedicated private VPN. Please don’t Torrent or file share on these VPN servers this will help retain a good connection for users of this service.
Spoofing user agent
Sometimes we may want to add a custom HTTP header to these requests. I will be using Tor and setting a Google Crawler as a user agent for additional obscurity. Google’s crawlers will often visit websites and are one of the least suspicious entities in the website’s error logs.
root@kali:~# nikto -host www.hackingvision.com -useragent "Googlebot (compatible; Googlebot/2.1; +http://www.google.com/bot.html)"
Nikto Basic Syntax
-config+            Use this config file
 -Display+           Turn on/off display outputs
 -dbcheck            check database and other key files for syntax errors
 -Format+            save file (-o) format
 -Help               Extended help information
 -host+              target host
 -id+                Host authentication to use, format is id:pass or id:pass:realm
 -list-plugins       List all available plugins
 -output+            Write output to this file
 -nossl              Disables using SSL
 -no404              Disables 404 checks
 -Plugins+           List of plugins to run (default: ALL)
 -port+              Port to use (default 80)
 -root+              Prepend root value to all requests, format is /directory
 -ssl                Force ssl mode on port
 -Tuning+            Scan tuning
 -timeout+           Timeout for requests (default 10 seconds)
 -update             Update databases and plugins from CIRT.net
 -Version            Print plugin and database versions
 -vhost+             Virtual host (for Host header)
Resources
Nikto web server scanner – https://cirt.net/Nikto2
Full documentation – https://cirt.net/nikto2-docs/
How to Hack Web Browsers Using BeEF Framework
pymultitor – Python Multithreaded Tor Script (Algorithm)
Kali Linux Man in the Middle Attack Arpspoofing/Arppoisoning